viernes, 19 de octubre de 2012

Patrón de Diseño "Singleton"


El Patrón "Singleton" sirve para cuando buscamos restringir la creación de instancias de un objeto, obligando que solo se pueda crear una única instancia (de ahí su nombre).

Un caso hipotético de aplicación podría ser: tenemos una clase BaseDeDatos que nos devuelve un objeto llamado "bd" una vez creada la conexión con la base de datos. En vez de permitir que las aplicaciones usen libremente la clase y puedan crear tantas instancias del objeto "Base de Datos" como aplicaciones y accesos a bases existan, se decide restringir la creación a una sola instancia y esta será compartida y usada por todos.

¿Cómo funciona el patrón de diseño Singleton?

La forma de proceder del patrón es la siguiente: si se solicita una instancia del objeto:

a) si no existe (o sea, la primera vez que se usa) se crea la instancia.

b) si existe una instancia (es la segunda o más vez que se usa), devuelvo la existente, todas las veces que se me solicite.

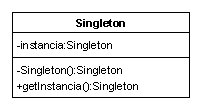
c) el constructor de la clase debe permanecer "anulado" definiéndolo como "privado". De esta forma se asegura que no se puedan crear instancias de forma directa y solo se permite a través del método "getInstancia()":

class Singleton {
    static
private $instancia = NULL;

   private function __construct() {}

    static
public function getInstancia() {
       if (
self::$instancia == NULL) {
         
self::$instancia = new Singleton ();
       }
       return
self::$instancia;
    }
}
// Ejemplo de uso

// Le pido al Singleton que me de una instancia
// del objeto. Como no existe, la crea.

// Nota: si hacemos "echo" de un objeto que no
// tiene implementado el método toString,
// el sistema despliega el número único que
// representa al objeto creado.
$inst1 = Singleton::getInstancia();
echo
$inst1;
// En el segundo caso, como existe la instancia,
// no la crea, y la entrega directamente.
$inst2 = Singleton::getInstancia();
echo
$inst2;


¿Ventajas/usos?

Como dice la introducción, tenemos controlada la creación de objetos y podremos además disminuir el uso de memoria al tener una sola instancia que se usa en todo el contexto de la aplicación.

martes, 25 de septiembre de 2012

Ejemplo de patron observer

<?php
abstract class Observable{
    protected $observers;
    function __construct(){
        $this->observers = array();
    }

    public function registrarObserver($observer){
        if(!in_array($observer, $this->observers)){
            $this->observers[] = $observer;
        }
    }

    public function deregistrarObserver($observer){
        if(in_array($observer, $this->observers)){
            $key = array_search($observer, $this->observers);
            unset($this->observers[$key]);
        }
    }

    abstract public function notificarObservers();

}

interface Observer{
    public function notificar($sender, $params);
}

class MiObservable extends Observable{

    public function __construct(){
        parent::__construct();
    }

    public function notificarObservers(){
        foreach ($this->observers as $observer) {
            $observer->notificar($this, $this->param);
        }
    }

    public function Evento($texto){
        $this->param = $texto;
        $this->notificarObservers();
    }
}

class Log implements Observer{
    public function notificar($sender, $param){
        echo get_class($sender)." envio $param a las ".date('h:i:s', time())."<br />";
    }
}

class SalvarLog implements Observer{
    public function notificar($sender, $param){
        echo "Guardando en BD $param enviado por ".get_class($sender)."... <br /><br />";
    }

}

$obj = new MiObservable();
$obj->registrarObserver(new Log());
$obj->registrarObserver(new SalvarLog());

$obj->Evento('Test 1');
sleep(1);
$obj->Evento('Test 2');

$obj->deregistrarObserver(new SalvarLog());
$obj->Evento('Test 3');
  ?>

Observe Your Object

    <?php
    class Log
    {
      public function message( $sender, $messageType, $data )
      {
        print $messageType." - ".$data."\n";
      }
    }
    class SubscriptionList
    {
      var $list = array();
      public function add( $obj, $method )
    {
        $this->list []= array( $obj, $method );
    }
    public function invoke()
    {
      $args = func_get_args();
      foreach( $this->list as $l ) { call_user_func_array( $l, $args ); }
    }
  }
  class CustomerList
  {
    public $listeners;
    public function CustomerList()
    {
      $this->listeners = new SubscriptionList();
    }
    public function addUser( $user )
    {
      $this->listeners->invoke( $this, "add", "$user" );
    }
  }
  $l = new Log();
  $cl = new CustomerList();
  $cl->listeners->add( $l, 'message' );
  $cl->addUser( "starbuck" );
  ?>

viernes, 20 de abril de 2012

Funcion serialize

En PHP es sencillisimo, ya que contamos con la función de biblioteca serialize:
<?
  $vector
["hola"]="Epa{}";
  
$vector["electric"]="Head";

  
print_r($vector);
  
$temporal=serialize($vector);

  echo 
$temporal."\n";
  
$matrix=unserialize($temporal);

  
print_r($matrix); ?>

Salida:
Array
(
   [hola] => Epa{}
   [electric] => Head
)
a:2:{s:4:"hola";s:5:"Epa{}";s:8:"electric";s:4:"Head";}
Array
(
   [hola] => Epa{}
   [electric] => Head
)

lunes, 16 de abril de 2012

Funcion xajax para mostrar funciones

 function mostrarClasificacionInventario($id_reporte,$id_ing,$perfil, $usuarioID, $id_area, $id_plantel, $id_soporte){
 
$objResponse = new xajaxResponse();  //se crea la clase
          
  $HTML = new autorizarInventario(); // se crea la clase que no va traer el html
 $modulo =$HTML->desplegar_clasifInventario($id_reporte,$id_ing,$perfil, $usuarioID, $id_area, $id_plantel, $id_soporte);


  $objResponse->assign( "menu-principal","innerHTML", $modulo); //se asigna en el div correspondiente

        return $objResponse;
     }

jueves, 12 de abril de 2012

Imploding and Exploding Arrays


You can also convert between strings and arrays by using the PHP implode and explode functions: implode implodes an array to a string, and explode explodes a string into an array.
For example, say you want to put an array's contents into a string. You can use implode, passing it the text you want to separate each element with in the output string (in this example, we use a comma) and the array to work on:
<?php
    $vegetables[0] = "corn";
    $vegetables[1] = "broccoli";
    $vegetables[2] = "zucchini";
    $text = implode(",", $vegetables);
    echo $text;
?>

This gives you:
corn,broccoli,zucchini

There are no spaces between the items in this string, however, so we change the separator string from "," to ", ":
$text = implode(", ", $vegetables);

The result is:
corn, broccoli, zucchini

What about exploding a string into an array? To do that, you indicate the text that you want to split the string on, such as ", ", and pass that to explode. Here's an example:
<?php
    $text = "corn, broccoli, zucchini";
    $vegetables = explode(", ", $text);
    print_r($vegetables);
?>

And here are the results. As you can see, we exploded the string into an array correctly:
Array
(
    [0] => corn
    [1] => broccoli
    [2] => zucchini
)

Looping Over Arrays


You already know you can loop over an array using a for loop and the count function, which determines how many elements an array contains:
<?php
    $fruits[0] = "pineapple";
    $fruits[1] = "pomegranate";
    $fruits[2] = "tangerine";
    for ($index = 0; $index < count($fruits); $index++){
        echo $fruits[$index], "\n";
    }
?>

Here's what you get:
pineapple
pomegranate
tangerine

There's also a function for easily displaying the contents of an array, print_r:
<?php
    $fruits[0] = "pineapple";
    $fruits[1] = "pomegranate";
    $fruits[2] = "tangerine";
    print_r($fruits);
?>

Here are the results:
Array
(
    [0] => pineapple
    [1] => pomegranate
    [2] => tangerine
)

The foreach statement was specially created to loop over collections such as arrays. This statement has two forms:
foreach (array_expression as $value) statement
foreach (array_expression as $key => $value) statement

The first form of this statement assigns a new element from the array to $value each time through the loop. The second form places the current element's key, another name for its index, in $key and its value in $value each time through the loop. For example, here's how you can display all the elements in an array using foreach:
<?php
    $fruits = array("pineapple", "pomegranate", "tangerine");
    foreach ($fruits as $value) {
        echo "Value: $value\n";
    }
?>

Here are the results:
Value: pineapple
Value: pomegranate
Value: tangerine

And here's how you can display both the keys and values of an array:
<?php
    $fruits = array("pineapple", "pomegranate", "tangerine");

    foreach ($fruits as $key => $value) {
        echo "Key: $key; Value: $value\n";
    }
?>

Here are the results:
Key: 0; Value: pineapple
Key: 1; Value: pomegranate
Key: 2; Value: tangerine

You can even use a while loop to loop over an array if you use a new function, each. The each function is meant to be used in loops over collections such as arrays; each time through the array, it returns the current element's key and value and then moves to the next element. To handle a multiple-item return value from an array, you can use the list function, which will assign the two return values from each to separate variables.
Here's what this looks like for our $fruits array:
<?php
    $fruits = array("pineapple", "pomegranate", "tangerine");

    while (list($key, $value) = each ($fruits)) {
        echo "Key: $key; Value: $value\n";
    }
?>

Here's what you get from this script:
Key: 0; Value: pineapple
Key: 1; Value: pomegranate
Key: 2; Value: tangerine